Tag Archives: photography

Aerial Panorama

A nice somewhat foggy morning with the sun rising and the early morning fog started to dissipate.

This panorama taken with my quadcopter taken at an altitude of 100′ above my local flying place, called Kite Hill. The uav was rotated and each frame was taken until the entire area was covered. Then the images were stitched to make the panorama, the sky was edited to fill in the upper part that the uav could not photograph. Click on the play icon and if you want to go full screen press the transparent icon in the upper right. You can scroll around in the panorama and look up an down. Enjoy.

[pano file="kitehill/kitehill.htm" preview="kitehill/khlp.jpg" width="900" height="500"]

Another year bites the dust…….

Well another year is in the process of slipping into the record books. Overall I think it was a good year, there is always room for improvement but in general things went ok. I am left filled with my usual feelings of not getting everything I wanted to get done, done. Oh well that is part of life’s rich pageant. I think having lots of tasks makes for a busy and fulfilling life, so I am not too worried that not everything was finished, they will be added to the next year’s agenda.

I am not usually one for lists or making “resolutions” but I try to set goals for myself, a subtle but real difference for me. Resolutions always seem like they are more trivial to me, easily broken and ignored.  Perhaps they should have more staying power and meaning but that is not what happens.  They seem easier to rationalize breaking.

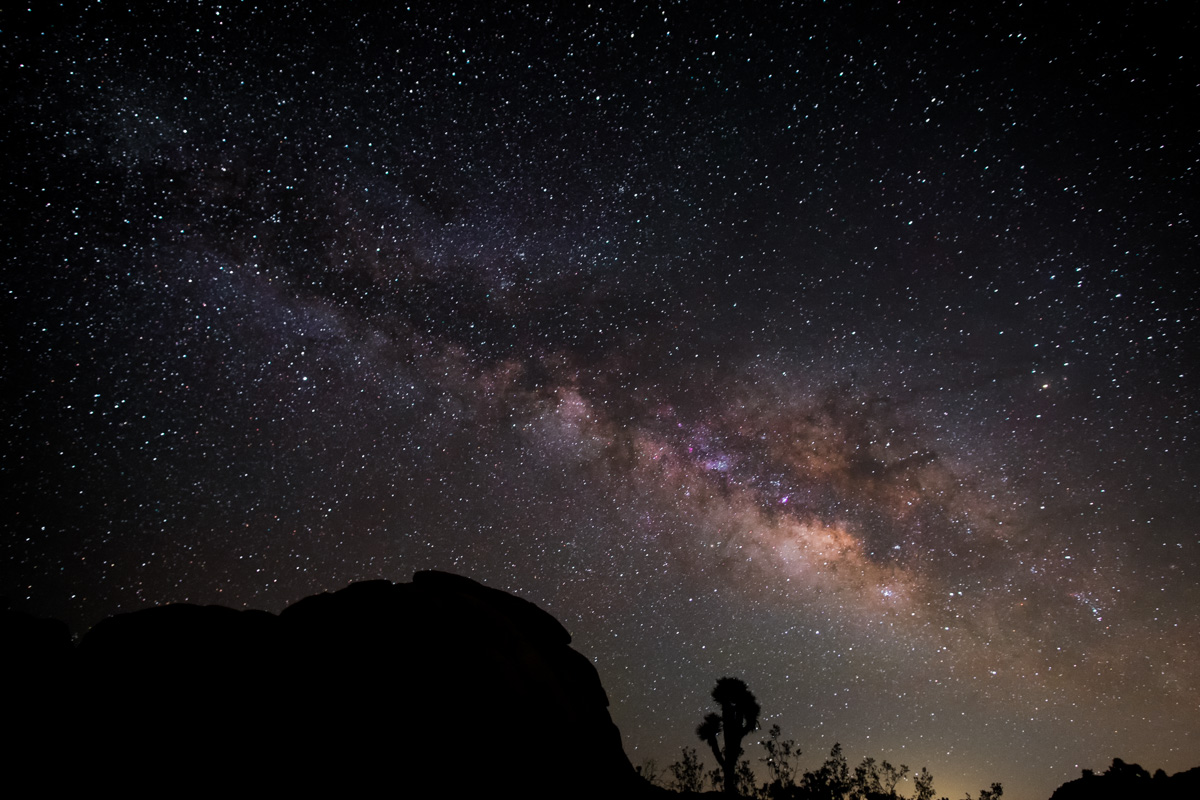
Some of the things I want to accomplish in this coming new year,  and in no particular order. I need and want to revamp this website, I really need to add some images and replace a lot of them with better versions and better compositions. I also am going to try and write more articles and perhaps that will get down to a lot more commentary but the goal is to be a lot more active with the blog. I have not done a lot to promote it, mostly because I think the site still needs a lot of work. I also want to refine my image post processing, take my time to do what is best for my sense of vision. I want to refine my vision and be more deliberate with my art. Do more starscapes, and also do more photography in general, but then I always want to do more photography! It is a standard year to year wish, and pretty much goes without saying…..

I also want to make better and more productive use of my time. Time is fleeting and never seems to be a lot of it left at the end of the day, but I want to make it memorable and productive.

It is always easier to second guess and have perfect hindsight, but I am really lucky to have my family, friends, and a decent job. I am also especially lucky to have my wife. She is my companion, fellow photographer, friend, lover and confidant that gets me back on track and helps me stay focused.

And I will leave you with the last sunset for me this year and best wishes to all and hope that the New Year will bring much pleasure and happiness.

Thanks for reading. I will leave you with the last sunset for me in 2014…..


The last sunset for me in 2014


More Colorado Fall Color

Some more eye candy from our trip to Colorado for fall colors. The San Juan mountains are such a wonderful place to see colors of fall. These are all taken by Barbara, my wife. She really does have a good eye and it makes it nice to have a travel companion on these trips. I am very lucky to have such a wonderful wife, friend and companion. We are looking forward to visiting here again, maybe next year.

Enjoy.


_DSF3826-web.jpg_DSF3843-web.jpg_DSF3886-web.jpg_DSF3918-web.jpg_DSF4005-web.jpg_DSF4052-web.jpg_DSF4057-web.jpg_DSF4060-web.jpg_DSF4073-web.jpg_DSF4133-web.jpg_DSF4195_6-2-web.jpg_DSF4521_2-web.jpg_DSF4584_5-web.jpg_DSF4673-web.jpg

Portable image backups

Just about any photographer at some point will travel to a location and photograph. That is what we do. Sometimes these locations are remote and sometimes they are just in the next town or countryside. Our captured photons are precious to us and before we can turn them into the works of art we saw when we captured the light, we need to bring them home safely. We carry extra cards, so that we do not run out of space and make sure we are able to capture that special moment. At some point we either start to run out of storage or we reach a point or have an experience that makes us realize we might want to back up and make a copies in case something happens. Something always happens, maybe not today or tomorrow but it will. Having backups is essential, especially when working for a client. Our bread and butter relies on us bringing home the goods. Many of us will travel with a laptop, then we are faced with the problem of once they are downloaded, we can format and reuse the memory card, but now we still only have one copy, or the other scenario is that we do not want to travel with a laptop and need someway of making copies to protect our precious images. Having redundant copies is essential, we do it at home, or if you aren’t you should be! Making backups is a critical function of being a digital photographer. We can carry small portable hard drives and hook them up to the laptop and make a copy of the folder. This is a good basic practice, some of us will carry two small drives and make two backups, safety first!

What about the other scenario, in which we do not want to carry a laptop or perhaps do not own one? A tablet will only hold a few images and certainly not a full days shooting or even close to multiple days, unless you are extremely frugal about capturing photons. I mean really, who only takes a dozen photographs? I am sure there are people out there but I know it would not work for me. I like to capture different angles, compositions, exposures etc. and soon the memory cards are getting full. It is not like the old days of film, where each shot was an expense, it still kind of is but not in the same sense. Shoot, chimp and check the histogram, doh not right, adjust and shoot again, that is the way in the digital age. I have found a couple of different devices that allow you to directly download a camera memory card and store them on a portable disk. They are very portable, recharge quite quickly and easily and are able to store a lot of data, good for a trip or while in the field. While they can be used standalone as the only backup on a trip, I use them as a secondary backup while out and about capturing images.  Another advantage is even if you are in the field, where it may not be possible to fire up the laptop you can still download and make a backup.

I have two portable backups, one I have had for about year or so and the other was just recently announced and acquired. The first is the Colorspace UDMA2 portable storage device and the other is the Western Digital WD My Passport Wireless. They are two different devices although they both provide portable storage. Why did I get two? Well they have different features, the Colorspace UDMA2 (UDMA2)  had a small lcd screen and and is accessed via some buttons below the screen, it has card slots for SD, Compact Flash cards. The WD Passport Wireless (Passport) has no screen, it has two buttons on the top and two leds on the front, and one SD card slot on the side. So the immediate advantage of the UDMA2 is the ability to have a menu screen and the ability to download CF and SD cards. The Passport is limited to only SD cards. I have cameras that use CF and SD but lately my main camera, the Fuji X-T1 uses the SD cards. Both units have WiFi capability, both have internal hard drives. Both units can be directly connected to computer via USB, the UDMA2 is USB2 only while the Passport supports USB3 speeds. My interest in the Passport was because of the higher speed when transferring data, although the USB specs are backwards compatible if it is truly USB3 speeds then it would make transferring data a lot faster. And when you have lots of data that can be a factor to consider.

Two types of portable backup storage for images

Two types of portable backup storage for images

So how do they compare? Well the physically the UDMA2 is 5.25″x3″x1″ and the Passport is 5″x3.75″x1″ so they are physically similar in size. The Passport has built in wireless and the UDMA2 has a wireless dongle that fits into the mini USB port on the side. As mentioned the UDMA2 has SD, and CF slots, a power switch, two mini USB ports, two leds and power plug port along the sides of the unit. It has a 3.5″ tft lcs screen that has a resolution of 320×480, not real high resolution but it works for the menu system and you can see small thumbnails of the stored images. Both units can stream audio and video to wifi portable devices, this is not something I have used but it is there. The UDMA2 comes with a form fitting soft case with a belt loop and the Wifi dongle and a charger for the onboard battery. The Passport comes with just a USB3 cable, which is very short and wall wort charger, it also does not come with any printed manual, only a few pictures that really do not tell you how to do anything with the Passport.  The Passport has two buttons and a USB3 port on the top and single SD slot on the side and two small leds on the front. The Passport is available in two versions, one that is 1TB, the other is 2TB of storage. The UDMA2 is available diskless which means  the user needs to go out and get a standard 2.5″ laptop drive and install it themselves. This is what I did, I have a good fast laptop drive and installed it and followed the initialization instructions and it was up and running, a very simple process. They include instructions and the proper size screwdriver, installation is very straight forward.  The Passport is preinstalled but must be configured before the first use. Both units can be hooked up to a computer and used as a standard portable storage device, so you can also copy to and from a laptop or desktop. Both units have user upgradeable firmware.

In terms of usage they are similar and also very different. The Passport must be configured by the user before use. In order to do this, they user must connect to the device wirelessly. So either you have to use your laptop or a smartphone to access the device and then configure and setup the passwords and any configuration. The Passport may be setup to automatically check the card reader and start the download of the data. It has a very dangerous option to also delete the contents of the card after downloading, I recommend highly that you do not set this option. Also be sure to set an access password to the device, as soon as you turn on the device it will broadcast an SSID and unless you secure the device others can access it. To download a card, merely insert the card and wait. The wireless led will turn from blue to white and start flashing while it is downloading the data. It will download to a default directory and it will set the folder name to unique name that is generates. The user has no way of making a meaningful folder name for each download. When it is done downloading it will stop blinking and go back to blue, the card can be removed at that time. It will not make a second copy of that card, if you remove and reinsert the card it will look at it and decide it has already made a copy and will not download it again.  So no way to make a second copy to make sure it was downloaded. When done you can power down the drive. The Passport does not come with any kind of case.

The UDMA2 is a little more flexible in how it operates, you turn it on and it gives you a menu with items to choose from, like import a card, look at the photos on the drive, another to access the files on a file basis, make copies etc. Another menu item for the wireless. Another unique item is that it has the ability to recover images from a corrupted memory card or deleted memory card. And also has a menu to access setup and configurations.  To import images, stick a card in the appropriate slot, select the import menu item and it will check and make sure there is a card and download the card, by default it sets the folder names to card1, card2, etc. After it is done importing it allows you to look at the thumbnails of the image, it will display the basic EXIF information, like the exposure and iso and you can also have it show a histogram. Because it is using the embedded preview image and the screen is low resolution you will not be able to check focus but you can take a rough look and see the important details like exposure and the histogram. You can also browse images after they have been downloaded.

In terms of real world usage of these devices, a big concern is overall speed. I think a lot of people are too preoccupied how fast a device is, but in the case of downloading image from memory cards, I am all over anything with some semblance of speed. Here is where the big difference between these two device lies.  For testing purposes I took the same 20 raw files from my Sigma DP2Quattro camera and placed them on two cards, one was rated at 45mb/s and the other 95mb/s. Both were Sandisk SD cards, the slower card being a Sandisk Extreme, while the faster was a Sandisk Extreme Pro. I chose the Sigma files because the raw files are large, around 60mb each and this gave a total of 1.11gb of data to transfer. This turned out to be an interesting test, first there was no difference in download speed between the two cards, in other words, whether it was the 45mb/s card or the 95mb/s card, the download time was the same,  while using the built in card readers on the devices.  Also in use in the camera, with the Sigma it does not matter but with my Fuji cameras, speed matters.  If I use a fast card reader attached directly to my laptop or desktop, the card speed matters. Well that was a bit of diversion, the big difference between the two portable devices was significant. The Colorspace UDMA2 download the card in about 57 seconds, while the WD My Passport Wireless took 2 minutes and 21 seconds, yes 57 second vs 2:21 seconds. That is a big deal, especially when you are downloading a ton of data and multiple cards. On a recent trip to Colorado, my wife and I shot about 119GB of photographs, and taking 2.5x longer was an issue. While on that trip I downloaded the cards directly to the Colorspace UDMA2, then I downloaded them to my laptop, then I used the laptop USB3 direct connection to copy the daily folders over to the WD drive. For me using the SD card download on the Passport was too frustrating.

My other beef with WD My Passport Wireless is that the only way you can set it up is via the wireless interface. In other words if you connect to it via the USB3 cable all you can do is access the drive as a portable drive. You cannot access or configure the wireless setup or any of the options. My other issue with the Passport Wireless is that I had to download the manual and read it before I could set it up. By default automatic download from the SD card is disabled, and wifi security is disabled. They do provide the manual on the drive. The printed foldout  guide included was a pointless waste of paper. The included cable is very short, too short in fact, about 12″. A longer charging and interface cable is needed at least for my uses.

So in conclusion I think the Colorspace UDMA2 is the way to go for portable storage with the ability to download images from memory cards, it can deal with two types of cards, has the ability to review the thumbnails and to view exposure information and a histogram. You get to choose how much storage you want and you can easily upgrade it. Battery life on both units is reasonable but the Colorspace UDMA2 charges slower but it has a battery level indicator, it also comes with a nice soft case. The Passport charges quickly but only shows the battery level by a single led color, it will change color with less charge. The Passport is good as an attached portable drive and an SD card reader on a emergency basis. Get the Colorspace UDMA2, it is the most flexible and faster of the two. In my usage the Passport is just another portable drive to attach via usb.


Colorado Fall Color

Here are a few images from a fall color trip Barbara and I took at the beginning of October. Colorado is really magical for fall colors, just gorgeous, miles and miles of aspens turning color and fluttering in the breeze. The cool breezes and the hints of cooler weather in the future really make it special. We spent about a week in the San Juan moutains, enjoying the vistas and the colors. There are so many places to explore and discover that we hardly scratched the surface. The photographs here are from the area just south of Telluride a storm system was approaching and we were on our way out of the area. A more mundane life was pulling us back to the hustle and bustle of day to day living. Enjoy.

I will continue to add more posts with more images as I get them posted.  On a technical note I only brought my mirrorless cameras, Barbara and I were shooting Fujifilm cameras, a X-T1 and X-E2. I also had my Sigma DP2Q and DP3m, but in this post these are all from me and the X-T1. Traveling with these smaller cameras is really a pleasure.


_DSF3824-web.jpg_DSF3862-web.jpg_DSF3875-web.jpg_DSF3917_8-web.jpg_DSF3926_7-web.jpg_DSF4035-web.jpg_DSF4069-web.jpg

Update on the Rokinon 12mm f2 NCS CS lens

A brief update on the Rokinon 12mm lens that I previously reviewed. I did get another copy of the lens and color cast that I saw in the previous lens was gone. So that is great news. I have shot with the lens some more including getting out and shooting under the stars. One of the main reasons I was interested in this lens was it might make a good lens for nightscapes. I have to say that it really does make for a good lens for night shots. The lens is still a bit soft at f2, but that is to be expected with a lens that is this wide. It is not to say that it is unusable, but it does perform better stopped down. If there is nothing close to the lens and most items are at infinity focus then it is hard to see the softness.  For most instances this not a problem and it is a wonderfully fast lens. I found that stopping down to f2.4 or f2.8 resulted in a general improvement, and by f4 is pretty good all over. That being said for quick nightscapes the faster aspects can be beneficial, and it will show less trailing. Even though this is a wide lens, with the crop factor it does give the field of view of an 18mm lens so that means that stars will start to show trailing before 30seconds, depending on where you point the camera.

This shot was from a quick trip out to Joshua Tree National Park, taken with a Fuji X-T1 and the Rokinon 12mm at f2.0 and ISO 3200, single exposure of 30 seconds.

Milky Way over Joshua Tree NP

Milky Way over Joshua Tree NP

The lens is a good deal considering the price and the performance. The downsides are the full manual focus and aperture and the lack of details being recorded in the EXIF of the camera. The Fuji does allow the setting the focal length so that is recorded, however the aperture used is not recorded. The lens hood also leaves something to be desired. It is really loose fitting and will sort of snap into place but there is a lot of play and I have found that it has come off sometimes in the camera bag, poor design, in my opinion. It is a functional hood for the wide angle lens but it could be better. The positives pretty outweigh the negatives. There is little chromatic aberration and little coma in the corners. I do expect some in a lens this wide but it is very negligible. Color and contrast are quite good. It has well corrected optics, much better than one would assume with a lens of this price point. It is also compact and relatively small for a wide angle lens. Focus ring and aperture ring are smooth and have a good feel to them. The aperture ring is detented at half f-stops from f2-f22. The lens feels solid and well constructed and is not weather resistant. The front is threaded for 67mm filters, which is nice.

I would recommend this lens, especially for the price point.  I would give the Fuji 14mm f2.8 lens the edge, it has the full autofocus, as well as manual focus and the ability to have auto aperture, but the Fuji is substantially more money. The Rokinon is a bargain and for me a nice lens to have in the bag and one that will get used, for nightscapes and landscapes. I will still keep my Fuji 14mm. The Fuji is a bit better corrected optically but the Rokinon does pretty well. The extra 2mm of the Rokinon does make a difference. I was also interested in the Rokinon 10mm but it is twice the weight of the 12mm and is not as appealing. The 12mm was designed for mirrorless cameras and therefore the size and weight are scaled accordingly, while the Rokinon 10mm appears to be a verison of their DSLR lens with a Fuji X-mount on the end, not as appealing. I am happy enough with this Rokinon that I do not feel the need to compare it to the Zeiss 12mm lens for Fuji.  For ultra wide I will stick with the Fuji 10-24mm f4.

Rokinon 12mm f2.0 for X-Mount – a first look

_MG_3048-web

Rokinon 12mm mounted on the X-T1

The Samyang/Rokinon 12mm f2.0 for x-mount was recently announced and has arrived in the stores. Samyang is the original manufacturer and the lens is also rebranded and sold under several names, including Rokinon.  I ordered one to take a look, nice and compact and it was certainly priced right. It is manual focus, manual aperture with no EXIF data being sent to to the camera, which is something that really irritates me, but oh well. At least Fuji anticipated that people might use other brands of lenses that might not provide that information so you can at least set the focal length using the camera menu. This allows you to identify the lens when you are using it in the field, but you do not get any aperture information.

I received my copy of the lens, packaged well for shipment in a plastic shell with a small manual and small cloth bag to hold the lens if needed in the camera bag. The lens shade is detachable and made from plastic. The locking mechanism  for the hood seems a bit weak and may wear after some on and off use, maybe not but I do not have a lot confidence in it. The aperture ring is smooth and has half stop detents from f2 to f22. The end of the lens barrel is threaded for 67mm filters. The focusing ring was smooth and gives a nice feel when focusing. The lens itself seems to be well built and rugged, it is not weather sealed. When inserted into the camera there is some play, it did not lock in place firmly.  I was able to twist and shift it a small amount between the stop in the lens mount, since there are no electrical contacts this should not really be a problem, although I wished it would lock in place better, this might be just manufacturing tolerances. The lens is light enough that it balances well with the camera.

Static testing

Distortion test

Distortion test

So off to shoot a few sample images. First off I wanted to see what kind of distortion I might get from a lens this wide. I figured there would be some distortion, it is hard to make a completely rectilinear lens and this was not an expensive lens by any means. The Samyang 14mm lens for dslrs had a really strong moustache type distortion which could be problematic.  So for my first target I set up a grid made from a filter from an air conditioner, it was   setup to be level and the camera was mounted on a tripod and square and level to the grid. As you can see from the image there is very little distortion. A small amount of barrel distortion that would be easily fixed in post processing, when and if you really needed to fix it, it most shots except for architecture you would probably not notice it.

One troubling thing, if you look on the image to the left is the yellowish color in the middle from the top to the bottom of the frame. This is not the color of the wall, and I did see this on the screen while taking the images, it is present in the images. The wall that this is on is a uniform blue color. It looks like it might be some issue with the coating or the type of coating with this lens, I don’t know if this is just my sample. So I brought out my other test chart. By the way these test charts are just something I threw together for me to see how lenses perform, other than careful alignment and doing the best I can to level and keep things straight, there is some room for some error. Not scientific at all so remember that.  Anyways, the next chart is made from some lens test charts by Norman Koren, downloaded and printed on white paper with my epson printer. They are mounted to a foam core board that is slightly yellowish and there are some spray glue remnants, remember this is not scientific, just my take on testing.

Up the chart went and everything was aligned. Test images were taken at all apertures. My purpose for this test was to see corner

Lens sharpness and vignette testing

Lens sharpness and vignette testing

sharpness and vignetting and overall lens sharpness. This image to the right was shot at f5.6 and also shows the same yellowish patches from the lens. Again this is disturbing. However, the lens is pretty sharp overall. Especially in the center, which is pretty typical of ultra wide angle lenses. At f2, which is wide open for this lens, it is somewhat soft, however the sharpness is acceptable at f2.8, both center and edge. The corners do not really get sharp until around f4 without sharpening applied and pretty good at f5.6. Below in the gallery are some corner crops from the upper left corner. Also there is pretty significant vignetting at f2 and gets reasonable at f4 and beyond. Click on the images to see larger versions and for the corner crops they are 100%.

Corner crop f2.0

Corner crop f2.0

Corner crop f4

Corner crop f4

Corner crop f5.6

Corner crop f5.6


Real world imaging

As I mentioned the color cast in the middle might not be noticeable in real world images. I did go out and shoot a few images in the real world.  These are shot at f11. The first was hand held and the second was on a tripod. Click on the images to see larger versions.

Cormorant statue at the park

Cormorant statue at the park

A view up the coast

A view up the coast

Here is a comparison shot with the Rokinon 12mm at f11 and the Fuji 10-24mm at 10mm and f11. The tripod was kept in the same location, just the lens was changed in between shots. You can see that an extra 2mm can make a difference in the field of view.

Fuji 10-24mm at 10mm and f11

Fuji 10-24mm at 10mm and f11

Rokinon 12mm at f11

Rokinon 12mm at f11

Conclusions

I was really hoping that this was going to be a great lens, the price was great, and Samyang has made some great lenses in the past. This lens is a little smaller than the Fuji 14mm f2.8 and has the same focal length as the Zeiss Touit 12mm f2.8 but at half the price. This price differential is what was really appealing for the Samyang/Rokinon lens. The build quality is there, the minimal distortion and the pretty good control of vignetting, and the corner sharpness even at wider apertures make this a really wonderful lens. The only thing that could be a problem is this discoloration I saw in my static testing. I am hoping this was just an aberration of my testing or my copy of the lens. I will give another lens a try and see if I can get a better copy, but before I send it back I will redo some of the testing on some different subject matter. The reality is that it is probably not noticeable, but I know some light colored building I will have to give it a try and see before I return it.

Is this a replacement for the Fuji lenses? No I don’t think so, it might be a nice addition or if you are on a budget it might be a good lens to get. It is really hard to beat the Fuji 14mm f2.8 or the Fuji 10-24mm f4, they are very high quality lenses.

Comparison of Rokinon 12mm f2.0, Fuji 14mm f2.8 and Fuji 10-24mm f4 lenses

Comparison of Rokinon 12mm f2.0, Fuji 14mm f2.8 and Fuji 10-24mm f4 lenses


Thanks for looking and I will update this when I have anything to update.


Pimping the X…..

Have you ever noticed that nothing is perfect out of the box?  They can be close to perfect but soon you notice a few wrinkles. A little more time and then comes the need for some enhancements. I am not talking about that “eX”, there is little you can do about that, but I am, of course talking about the X-series cameras from Fujifilm. These compact wonderful little cameras just beg for a little enhancement. Some of the enhancements are just cosmetic and maybe you have gone through that with your “X”. There are some that are really needed to enhance the experience and the usability. Let’s take a look.

Grips, tripod plates, thumb rests and other handling enhancements.plates-web

Lets face it, these are small cameras and there can be some issues with handling. They were not as problematic as I envisioned them. When using the X-Pro1, X-E1, or X-E2 I think a Thumbs Up thumb rest is a mandatory item. It gives me a nice comfortable but firm grip with my thumb, the disadvantage is it uses the hot shoe so it has to be removed when using the flash or a flash trigger.  That is unless you use the sync port on the X-Pro1 or X-T1. It does prevent me from hitting buttons on the back of the camera as easily by mistake. Yes the original Thumbs Up is expensive but it is well made, fits perfectly so you pay a bit more for a quality product rather than cheap knock off. It always surprises me when people gripe about the cost when they spend $500 on a bag to carry the camera, but I guess it is all relative. The X-t1 has a different design for the body and does not lend itself to the use of a thumb grip, like the rangefinder style cameras.

Soft release is another essential item for the X-series at least up to the X-T1. At first I thought the soft releases were just joke and how could they make the shutter button better? Well once again, use and testing revealed otherwise. The cameras up to the X-T1 have a screw in shutter release capability, just like the older film cameras, the soft release screws into the shutter button and really does change the feel of the button and how it operates. I wish the X-T1 could use one, although I see that at least one manufacturer has a stick on version for the X-T1 now. The button on the X-T1 does feel pretty good, or I am just getting used to it, since there are not many options.

When doing landscapes, nightscapes, and long exposure photography a good tripod mount is needed. Fuji in their infinite wisdom (sarcasm alert) decided to put the tripod mount screw offset from the lens center and close to the battery door. I don’t know what they were thinking, any kind of quick release plate and you are blocking the battery door. The grip for the X-Pro1 was nice in that it attached to the bottom, gave a nice larger grip to hold and moved the tripod screw to the centerline of the lens but they still blocked the battery door!!! Well Really Right Stuff to the rescue. I use Arca-Swiss compatible ball heads so the RRS L-plate incorporated the ability to use the Arca-Swiss style ball head, and still allowed access to the battery door without having to remove the plate. The RRS plate also has an optional grip but I found it unnecessary on the X-Pro1. The RRS has a better build quality and is well worth the extra few dollars than the cheap knock-offs. They are currently developing an L-plate for the X-T1. The optional grip attachment just did not feel right to me, it was machined aluminum and I like the leatherette feel like on the body and that grip extension just changed the feel too much and added some weight to the camera.

For the X-T1, Fuji did listen to customers and critics and came out with two different grips. One is a battery grip that holds an extra battery as well as additional controls for use while in the portrait orientation. I originally thought I would find this an essential item, like I did for my dslrs, but for this camera I do not think it is needed. You do get the extra battery and so it would take twice as many images on a charge, but when it comes time to change the batteries, you have to take the grip off to change the battery in the camera. That could be tiresome but I guess you would get used to it. The attraction to me for these cameras is the compact size and I am sure that the battery grip is useful, I think it changes the camera to one that is no longer as compact. This commentary on the battery grip is coming from not actually handling one but after handling the X-T1 I just feel it does not need the added weight. I reserve the right to change my mind!

They also made another grip, that adds a thin bottom plate that is also Arca-Swiss compatible as a quick release plate for ball heads, and it added some extra grip to the front of the camera. And low and behold, you can access the battery and change it without removing the plate! Also it moves the tripod screw to the optical centerline. The MHG-XT as it is known looks to be a good addition, I am still getting used to mine, not sure I am happy with the feel of the new grip and how it changes how I hold the camera. It is a little bit different grip, but enough to make it a little uncomfortable. It also lacks a L extension for portrait orientation while using a ball head. It is well made but it may not last in my inventory. I think an RRS L-plate will be of more use to me.  Some of you are wondering why I would want an L-plate when the Fuji grip already has the quick release style plate, well when you move a ball head 90° you limit some of the movement, so it is not as easy to position as it is to just reinsert the camera in the portrait orientation from landscape orientation. When using a L-plate in portrait orientation you have a full range of motion available, just like when the camera is rotated to landscape orientation. The MHG-XT is well made and fits the camera very well, a nice addition but still waffling on this one, it just may take some time to get used to it.

Cases_MG_3010-web

Cases are a mostly cosmetic enhancement, more bling than functionality but there is some utility. I am not a fan of full leather cases in general, but the rangefinder style body in a leather half case just looked cool. I admit it, it was a blast from the retro past with a tinge of hipster that I am loathe to admit. I started with film cameras and manual focus but I never had a rangefinder or used one. I was intrigued with them and I have some older cameras that I inherited that have leather cases. So off to Ebay and a search for some leather cases and I got a tan leather half case for the X-Pro1. It looked nice, it fit nice, it did offer some protection, enough to rationalize its use and a bonus is that added some thickness to the grip and that with the Thumbs Up made for an easy to hold and use setup. The leather case also added a tripod screw, so good to go for tripod use when needed.  There was a bump in the road, the battery door was blocked, you had to remove the case to access the battery and the memory card…. arrrrrrr. So with a little wielding of a sharp knife, some patience and a little blood, there was an access port in the bottom, the case could stay on, at least while being used hand held. it looked good and when doing landscape work I could either place a small release plate on the bottom or for full blown dedicated photon harvesting, change out the case for the L-Plate. Versatility and style……_MG_3011-web

The case for the X-Pro1 worked out so well that I decided after getting the X-T1 to add a leather half case. Gariz was out early with a case designed for the X-T1. Again this was off of ebay directly from Gariz in Korea. Several colors were available, the medium brown was really tempting, however I opted for the black. Fuji also had a leather half case available in black but I heard initial reports that they blocked the SD card door! You had to remove the case to get at the memory card….noooooooo Fuji how could you  have designed this into the case? The Gariz did not block the access to the door or the battery door on the bottom. Gariz also installed a metal bottom plate and added a tripod screw along the centerline of the lens. The on and off is easy with ringed screw to allow tool less installation and removal. The ring on the attachment screw can also double as a ring for sling type strap. After a short time, my airmail package arrived and inside was a nicely made black leather case with a chrome plated bottom plate. The workmanship is excellent and the fit is excellent. What could go wrong? Well actually a minor detail, the half case fit so snugly that it prevented the lcd from tilting. The lcd was hitting the nice bottom padding, you could loosen the attachment screw but that was not a good solution. On the Fuji X-forum another user posted about the same problem and had a brilliant solution, a small paper shim. The shim worked wonderfully, a couple of small pieces of heavy weight paper and that allowed enough space for the lcd to tilt in and out easily. If you are looking for a leather case, I can highly recommend the Gariz case, well made, fits perfectly, well designed and engineered. May need a couple of strips of paper as shim, but that is just a minor issue. Well worth it.

Straps and bags and protection

Well this is a topic that can be a highly personal one, me I am not too fussy with straps. I am mostly concerned with comfort and functionality. How it looks is secondary, yes I know that sounds contradictory when I was nattering about the leather case. It is what it is….. So I use a webbing and padded nylon type strap. Something that looks decent and comfortable, no way am I going to spend $250 on a thin distressed leather strap. I do have limits to my insanity. I have always used neck straps with the camera hanging down to my chest. The Fuji now has me considering to try a wrist strap, something I have always thought I would not like. I am keeping an open mind and will give one a try and see how it works for me in real life.

Bags are a topic for another post, my quest for the “right” bag is still on going. I am not sure that it will ever be finished. Doing photography for over 30 years has taught me there is no perfect bag, yet. I keep hoping. I have gone from shoulder bags, to backbacks with impossible loads. Then to the smallest bag I could fit the mirrorless camera in and now heading towards the messenger type bag. No bag seems to have exactly what I want when I want it. Most of my bags are nylon, I just cannot justify those fine leather cases that are too tiny for use and cost $300-$700. Nope can’t do it. Cameras and optics I will spend the money on, but a bag just because it looks cool and costs $500, no way. A lot of those trendy, hipster style bags of canvas and leather are just not functional enough for the price. There are some that look cool, and I am sure they worth it, but I just cannot justify them. I am sure that some will think I am just dismissing them but I just don’t see the need to spend that much on a bag when there are others that will do the job just as well.

LCD screens on the back of the camera can be a problem depending on how you handle the camera. I always use a protector on the LCD screen, this prevents scratches and accidental marks on the back that may interfere with reviewing images.  It can also affect your view when you use the back of the camera to compose a shot. I do try to handle my cameras carefully but accidents do happen and the more you use a camera the more chances are that something may happen to it. One of my reasons to get the Fuji x-cameras was to have a light weight, easy to carry camera, so I carry it with me almost every day. Wear and tear does happen. LCD screen protectors are cheap insurance, easily replaced and worth every penny.

A soft cloth or wrap can help protect your camera if your bag does not offer enough protection. My Thumbs Up  is starting to show some brass from rubbing through the finishing on the end from caused by the small bag it is usually carried in. When I first got the X-Pro1 I had the three individual primes, so that is what I carried and had a bag just big enough to house them all, so there is a little friction in the bag. Now with more gear I need a bigger bag but a lot less bag than for the dslr.  Also fingers and constant use cause wear and tear and the camera is starting to develop that used patina.

When it was time for my wife to get a new camera, we got her a nice shiny new X-E1 and also added the lcd protector, L-plate, Thumbs Up and soft release. She also thought all of that made for a nice improvement in handling.

So in conclusion there is not a lot of enhancements needed for the X-series cameras,  they are fun, functional and easy to use cameras. Add a Thumbs UP, lcd screen protector and maybe a grip or case and something to carry it all in, is all that is needed for a good time. It will make handling better and I think improve the overall experience.  For the X-T1 there were less gadgets to get Fuji really does listen to user feedback and does change for the better, just look at the firmware updates. A great system to buy into in my opinion. Another add benefit for me is I spend a lot less time looking for gadgets and more time shooting and using the camera, what a great concept. The X-series is made to be used.

MHG-XT

MHG-XT


X-Pro 1 modified leather case

X-Pro 1 modified leather case


Gariz X-T1 half case

Gariz X-T1 half case


Chimps at the Los Angeles Zoo

Last month I headed out to the L.A. Zoo. I carried with me my trusty Fuji X-Pro1 and the two zooms, while at the Zoo I have the 55-200mm a good workout. I stopped and spent some time looking and watching the chimps.  They can produce some interesting expressions.  A lot like humans although I am not sure we can apply that many human thoughts to them, it would be interesting to know what they are thinking. This chimp always seems to have a somewhat sad expression. It may be the just the way his lips meet. (click on the image to see a larger version)

Waiting

Waiting

Here again is the same chimp although he has moved over to a small overhang. This looks to me like he has been given a “time-out” and told to sit and watch the others….


Time Out

Time Out

And here is a shot of the family group, all seeming bored and facing yet another day of the summer doldrums. I guess that is life at the Zoo.

Summer Doldrums

Summer Doldrums

Hope you enjoyed these images. Thanks for looking.


Back from my hiatus

Well I am back from my self imposed hiatus. I really did not intend it to be this long, but that is what happened. My original intent was to take a couple of months off from the blog and the web site and concentrate some more on google+ and just taking pictures. Well a couple of months stretched into almost 8 months. I started to really miss writing the blog and I really decided I needed to do a better job with it.

In this off time I have been doing photography, which I love. I have been spending time learning more about myself and the art of photography. I have tried doing a mentorship and being more involved with some google+ communities. My desire was to push myself a little and expand my creativity. Was it worth it?  Well hard to say, there was no giant revelation, no sudden epiphany. I did learn somethings but in reality I learned about myself and I guess that was the best thing to come out of this time period. I did not do as much photography as I would have liked but I could probably always say that as long as I am working a regular job and fitting photography in on the side.

I have also spent a lot more time reading about photography and really getting out more and looking at what other people are doing and what the great photographers have done, it has been quite educational. I have also spent some time running through a lot of tutorials and learning more about how I want to process my images and techniques and tools to accomplish my vision.

Adobe’s hard stand on renting software has also really bothered me, the concept does not necessarily bother me. but the implementation and the cost have been very distasteful. So I am looking for alternatives and changes to make transitions away from Adobe as smooth and productive as possible.

I have some great ideas for articles and some reviews and some techniques to share, if I still have any followers left after all this time. I will also endeavor to get back to having more followers and really make some efforts to get more images online. Although I have been sharing a lot of images online at google+. I have some plans to revamp my Flickr pages as well. All of this will take some time, but it is something I am looking forward to more that I did last year or the year before.

I am always open to comments and suggestions so please feel free to drop me a line or leave a comment. You can also look for me on google+.