Tag Archives: CA

West Point visits the Kuhn

On December 26, 2015 The Orange County Astronomers had some visitors from the West Point Military Academy. They stopped by to see the club’s 22inch telescope, known as the Kuhn Telescope. They were being hosted by Pat Knoll, Ralph Emerson, and Trey Mcgriff, who helped install a telescope setup at West Point. Here is a portrait of the group  beside the Kuhn Telescope. Dr. Paula Fekete is shown at the telescope eyepiece.

Some visitors from West Point Military Academy at the OCA Kuhn Telescope
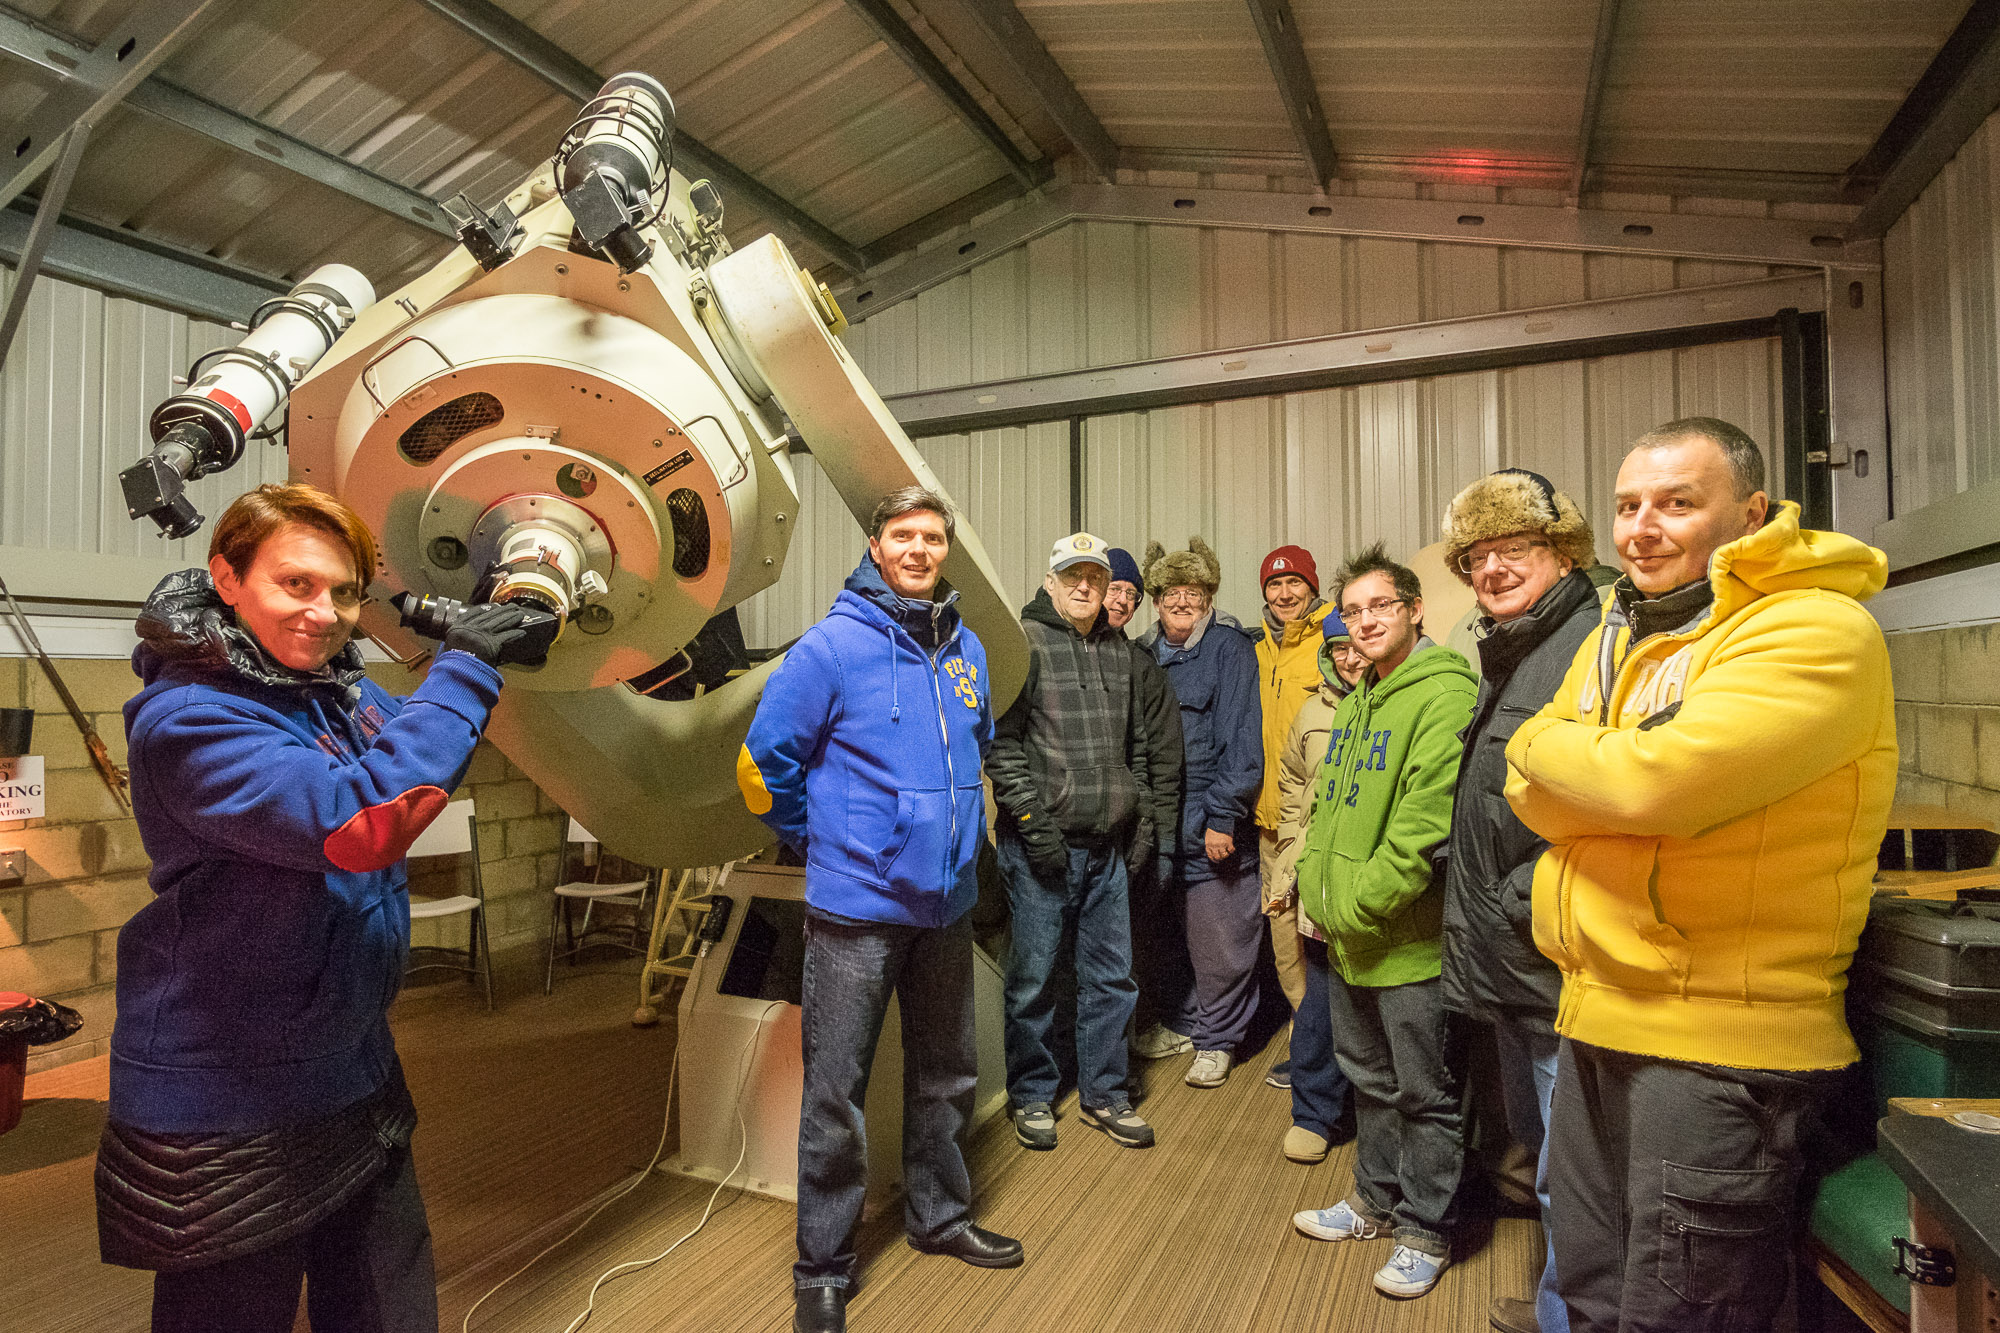
After posing for this shot we took a VR panorama, click on the image below to view a larger version, you can also expand it to the full size of your screen. Click and drag in the scene to scroll around.  Even though it was a cold and very windy evening, we had a good time.

[pano file=”wp-visit/wp-visit.htm” preview=”wp-visit/WP_p1.jpg” ]


Aerial Panorama

A nice somewhat foggy morning with the sun rising and the early morning fog started to dissipate.

This panorama taken with my quadcopter taken at an altitude of 100′ above my local flying place, called Kite Hill. The uav was rotated and each frame was taken until the entire area was covered. Then the images were stitched to make the panorama, the sky was edited to fill in the upper part that the uav could not photograph. Click on the play icon and if you want to go full screen press the transparent icon in the upper right. You can scroll around in the panorama and look up an down. Enjoy.

[pano file="kitehill/kitehill.htm" preview="kitehill/khlp.jpg" width="900" height="500"]

Sigma DP2 Quattro – High resolution niche camera

Around the end of June I got an email from Sigma, the lens and camera manufacturer, announcing their “Try Before You Buy” program for the DP2 Quattro camera. This camera was announced earlier this year and it is a predecessor to their DP Merrill line of compact cameras. These cameras are based on the Foveon sensor which records color for each pixel instead of using a Bayer matrix and interpolating the color. This leads to an increase in resolution, how you classify that is open for some debate. The DP2Q uses a new version of their innovative sensor, in that it records a full resolution luminance and blue chrominance and reduced resolution red and green layer. It still records color for each pixel.  They have a lot more information on their website.   One of the advantages is that  there are no filters in front of the sensor, and one of the disadvantages is the sensor records each color in a different layer, the deeper the layer the lower the intensity of light as it penetrates deeper, and this can lead to more apparent noise. So the sensors do not do real well in high ISO, dim light situations. The benefit of these sensors, is they can deliver a ton of resolution in a small and compact package.


Sigma DP2 Quattro

Sigma DP2 Quattro

The camera is not your normal looking camera, it is long and thin with an angular grip on the right hand side, which has the shutter button and main controls and also houses the battery.  The lens is a fixed lens, 30mm f2.8 and has the equivalent field of view of a 45mm lens on a full frame camera, the crop factor is 1.5x.  The grip is very angular and I found it could be uncomfortable to hold in one hand, I suppose you could get used to it but it really lends itself to being held in both hands. There is hot shoe on the top centered over the lens as well as a standard tripod screw socket on the bottom, centered approximately at the centerline of the lens and at the sensor plane. This will at least make it easier for doing panoramas. The memory card is located on the left side of the camera and has a rubber type cover that is a little awkward to remove each time you want to access the memory card. That type of cover is usually used for covering ports that don’t get used often. If you have short fingernails it can be problematic to get the cover off. That was not the best choice. The battery loads from the bottom in the grip area.  The top of the camera has a small button for turning the power on and off, a mode button for setting the the various modes, like program, aperture priority, shutter priority or manual mode. There are two rotary switches on the top, the front most one has the shutter button on it and rotating controls one of the settings depending on the mode. The rear most rotary switch controls the exposure compensation or aperture in manual mode. On the back there is a nice 3 inch lcd screen. It is not moveable or tiltable, which is really a shame.  The four buttons to the right of the lcd control various functions and includes the menu button. On the rear of the grip area is a button surrounded by a 4 way toggle. It is a directional switch as well as turning the focus mode from manual to autofocus and also for selecting the focus point. The lens also has a small, thin ring that can be used for manual focusing, it is fly by wire type focusing. The hood is a little large but usable and uses a bayonet mount to attach to the front of the lens. The lens is also threaded for 58mm filters.


Sigma DP2 Quattro rear view

Sigma DP2 Quattro rear view

Field Testing

As I mentioned earlier the grip is not very ergonomic, at least for my hands it put some pressure at points that made it uncomfortable to hold for a long time period in one hand. Using two hands was a lot better, balanced quite well.  The camera will focus quite fast if the light is decent, seems to hunt a bit in low light. There are only 9 focus points,  8 points centered around the center point. These are easily accessed, pressing down on the 4 way button and then selecting the point you want and pressing the center button to return from the selection. The drawback is that there are only 9 points. I have been spoiled with DSLR’s and my Fuji X-cameras and I am used to having a lot more focus points. When manually focusing you can press the center button on the 4 way to zoom in and check focus at the selected focus point, this is really nice. Manual focus is “fly by wire” and responsive. There are two zoom factors, but you need to press the center button to exit zoom mode. You can autofocus and then adjust the focus manually, without having to switch modes. When you select manual focus a small distance scale appears near the bottom of the lcd screen. The distances marked are very coarse and not very useful, smaller divisions would have been more helpful.

Once you press the shutter it can take a few seconds before the camera will respond again, even though there is a 7 shot buffer, it is not a fast shooting camera at all. The raw files are huge and do take some time to write out. Having a faster memory card does not help, it still takes a very long time in modern camera times. The camera is a slow and deliberate imaging device that does not lend itself to shotgunning and rapid fire.  Raw files were in the 50-65mb range, depending on details, so there is a lot of information being written out to the files. The camera can record jpg, raw and jpg+raw. The jpgs looked nice but for this camera raw is the way to go.

The 3″ lcd on the back of the camera is nice until you get out in the bright sun, then it is very hard to see anything on it, let alone try to focus and frame. This is not that unusual for cameras that rely solely on the rear lcd. Sigma does make an optical viewfinder that slides into the flash hotshoe. This will give you an idea of framing but any exposure or focus information will have to be from the lcd. Sigma did not include one of the viewfinders for the trial. I really wish they had, and I think it will be a necessary item. On the screen you can also turn on a level and tilt indicator, which takes up a fair amount of the image area and can be disabled easily, but it is useful for initial setup for a shot. Also a live histogram can be enabled. I used this a lot, however, even if the live histogram was not showing any blown highlights I was getting blown highlights. So I ended up dialing in exposure compensation of as much as a stop in bright contrasty light. I did not see anyway to enable the histogram or a blown highlight indicator when reviewing images on the lcd, I think this is really an essential feature that has been left out of the camera. The camera also has the ability to bracket shots, which is nice and it is selectable in 1/3 stop increments, up to +/- 3 stops. The down side of bracketing is that it can take awhile to write out all three shots and the camera is not very responsive.

Battery life was reasonable and I seemed to get around 250-300 shots on a battery,  however the camera does get noticeably warm. In fact it can get quite warm. I noticed the warmth on the left side where the SD card is located and also on the right side in the flat area next to the lens. It is almost if the processor inside the camera is using the case as a heat sink. On a warm SoCal day it got quite hot, hot enough that the “overheating” icon started flashing on the lcd. This is the first camera that I have that had an overheating icon, let alone having it come on. It did come on several times on a hot day, so I shut the camera off and sat in the shade and let it cool down. It would cool down in about 5 minutes or so with the camera off and then back to shooting.

Raw Conversion Software

Barrel cactus

Barrel cactus shot at ISO 100 1/30 @ f16

Raw conversion is another possible issue for some users. The raw format from this camera is only supported by Sigma, the manufacturer. So you will not be able to use Adobe Lightroom or Capture One to process your raw files. You must use Sigma Photo Pro. This software is easily downloaded from the Sigma site and they have versions for PC and Mac. The software seems to have most processing features you might want to use. However it is a very slow piece of software, loading images takes some time, as well as any time you move a slider, it will take 10 seconds or so to update the image. While I realize that there is a lot of data, in today’s world that is slow and can be frustrating when you catch your self not allowing time for the update to catch up. It is not real time adjusting.  Also when you load an image it does not reset any of the previous settings that you use, so you need to go and manually resets each group of sliders by pressing on the respective reset buttons. Sigma Photo Pro, or SPP, does have a image browser so you can look at thumbnails and then click on the image to edit, and it will use two monitors if you have a dual monitor setup. One thing I found annoying is that the thumbnails, even in the “large” setting are too small to really see any details. I found that Breezebrowser allowed me to browse the thumbnails and see a larger version so I used that to browse the images to select the ones that I wanted to bring into the editor. The SPP also has a few bugs, at least the current version that I tried during this period. I found that if I set the box to save the image settings while I was saving the file out as tif or jpg, when I went back to edit another image it would crash on loading the image. This was solved by not checking that box, also it seemed that it never saved the image settings anyways, so kind of a moot point.  Another thing that was missing was any kind of curves, all adjustments were via sliders. I also found that the sharpening slider quickly resulted in artifacts so I would end up doing any sharpening in a different software. Another “feature” that is annoying, when you start up SPP, it goes out and looks at each and every drive on your system, so if you have some network drives that are “sleeping”, it wakes them up and accesses them. So you sit there staring at and empty framework while all the drives spin up, it does this even if it has never accessed the drive before. The slowness of the software was consist on all the computers I tried it on, originally I was using my laptop and thought switching to the much more powerful desktop would speed things up. Turns out that was not the case at all.

Image Quality

_SDI0685-Edit1-corner crop-web

Corner crop of the cactus image, 100% crop from the upper right hand corner

As with any camera the overall image quality is what really matters. After all a camera is just a tool. The size of the image from the DP2Q can be a matter of discussion, the RAW file, straight out of the camera is 5424 x 3616, which is a decent size image. You can save it, after processing in SPP, at a super high setting of  7680 x 5120 in both jpg and tif or you can save it in the default size of 5424 x 2616 or even a half size or double size image. I only save at default size and super sized, I saw no real benefit in the half size or double size images. You can also select 8bit or 16bt for the tif and you can also select the color space.  The larger size is very hard to tell from the smaller size. There seems to be a little resolution loss but I did not take enough samples to be completely sure. The larger size is certainly getting closer towards the size of medium format. Since there are no filters at all in front of the sensor elements the resolution and sharpness is quite amazing. That is if the photographer has done their job, any kind of camera shake or instability can affect image quality. So this is one of those cameras that best practices results in better images. In general I found colors to be bright and vivid straight out the processing software, white balance was pretty accurate most of the time, but in some conditions and with people the color balance seemed a little off to me. I am very used to having the white balance nailed, especially with my Fujifilm cameras and with the Canon dslr. If you look closely at the crop of the cactus image to the right, you can see a ton of detail in this image. The crop is from the upper right corner of the previous cactus image. There is no distortion that I could see with this built in lens, optical quality is excellent. The details are really amazing, the crop is at 100% and no additional sharpening was used. Notice the fine details in the fuzz between the spines and the rings on the spines. The bokeh at wide open apertures was quite pleasing and having the f2.8 was nice.

 Final Thoughts

Well it was too bad that I had to ship the camera back to Sigma, I had it in hand for less than a week. I wish I had some more time with the camera to really put it through its paces. This was the first Sigma camera that I had used, I have used many of their lenses. That being said I had read about and researched their DP Merrill series of cameras, the one that this DP2Q is replacing, and I often lusted after one. I did understand the shortcomings of those cameras but the images were compelling with lots of detail. This new generation is along those same lines. There are good things, and some not so good things about this camera.

The camera is capable of taking amazing images with fantastic detail, if the photograper is careful and uses best practices. That means careful focusing, stable platform, watching shutter and aperture, taking the time to get things right. It is not a point and shoot. It really needs to be shot at low ISO ranges, the camera is capable of 6400 but I think a more realistic limit for color is about 800, and you can do a lot with black and white images up to ISO 1600, beyond that it is not that great. Image quality degrades, lots of noise and blotching. So keep it low ISO.  I put a Arca swiss type release plate on the camera and used a tripod as much as I possibly could, this slowed things down and made it deliberate, which is what this camera needs. It is slow, in a relative fashion compared to other cameras, but not really that slow compared to cameras a few year ago, and those had much lower resolutions. Watching exposure is a must and sometimes bracketing is needed to assure that you captured the image. The controls are well laid out and easy to change and are well thought out, just the grip leaves a lot to be desired. I did try the flash that was sent with the camera, it worked ok and seemed to do an adequate job, not something I would use much with a camera like this, but if you need a quick shot, it is worth it. The software is slow, no matter what machine you run it on, it takes some time to get used to it. The best thing to do with the software is adjust exposure, white balance, lower sharpening and output a 16 bit tif and edit in some other software with more features.

What it really needed was some sort of electronic or mechanical shutter release, there might be one, but unless it uses the USB port I did not see anyplace to attach it. That would be nice to have, especially when using a tripod. Another nice thing to have would be an optional Electronic View Finder, but I don’t see that one happening. A tilting lcd screen is also something I really wish they had on this camera, the might mitigate some of the bright light usage issues and also make it easier for tripod use. I am not sure how well their optical finder works, as it was not included.

So in conclusion, it is capable of amazing images if used with care and some tolerance of quirks. In other words a nice camera that will have an appeal for those who can appreciate a niche camera. If you are looking for a snappy point and shoot to chase the cat around the house, this is not the camera for you. If you are looking for a camera that will challenge you to get the best images you can get, then you have room in your bag of tools for this camera.

I still have a backlog of images to process but here are few more samples. Click on any of the images to see a larger version.  Feel free to contact me with any questions, and if you are with Sigma and want a tester…….. be happy to help. Thanks for reading.

UPDATE: 30 July 2014

I just wanted to clarify a few things. In my look at the DP2 Quattro I was wrong about the blinking highlights, those can be viewed during the review process, I read about it in the manual, when I get the camera I will be sure to enable it. The other thing is that Sigma is making a release for this camera, it plugs into the USB port and is relatively cheap to purchase, it is a simple button with a hold function

Sigma has also announced that within the next two weeks there will be a camera firmware update and an update to SPP, hopefully that will clear up a few of the bugs.


_SDI0010-Edit1-web.jpg_SDI0032-web.jpg_SDI0105-a-web.jpg_SDI0203-a-web.jpg_SDI0231-web.jpg_SDI0468-web_SNSHDR_3-web.jpg_SDI0473_4_5_tonemapped-web.jpg_SDI0483-web.jpg_SDI0604-web.jpg_SDI0709-web.jpg


Update on the Rokinon 12mm f2 NCS CS lens

A brief update on the Rokinon 12mm lens that I previously reviewed. I did get another copy of the lens and color cast that I saw in the previous lens was gone. So that is great news. I have shot with the lens some more including getting out and shooting under the stars. One of the main reasons I was interested in this lens was it might make a good lens for nightscapes. I have to say that it really does make for a good lens for night shots. The lens is still a bit soft at f2, but that is to be expected with a lens that is this wide. It is not to say that it is unusable, but it does perform better stopped down. If there is nothing close to the lens and most items are at infinity focus then it is hard to see the softness.  For most instances this not a problem and it is a wonderfully fast lens. I found that stopping down to f2.4 or f2.8 resulted in a general improvement, and by f4 is pretty good all over. That being said for quick nightscapes the faster aspects can be beneficial, and it will show less trailing. Even though this is a wide lens, with the crop factor it does give the field of view of an 18mm lens so that means that stars will start to show trailing before 30seconds, depending on where you point the camera.

This shot was from a quick trip out to Joshua Tree National Park, taken with a Fuji X-T1 and the Rokinon 12mm at f2.0 and ISO 3200, single exposure of 30 seconds.

Milky Way over Joshua Tree NP

Milky Way over Joshua Tree NP

The lens is a good deal considering the price and the performance. The downsides are the full manual focus and aperture and the lack of details being recorded in the EXIF of the camera. The Fuji does allow the setting the focal length so that is recorded, however the aperture used is not recorded. The lens hood also leaves something to be desired. It is really loose fitting and will sort of snap into place but there is a lot of play and I have found that it has come off sometimes in the camera bag, poor design, in my opinion. It is a functional hood for the wide angle lens but it could be better. The positives pretty outweigh the negatives. There is little chromatic aberration and little coma in the corners. I do expect some in a lens this wide but it is very negligible. Color and contrast are quite good. It has well corrected optics, much better than one would assume with a lens of this price point. It is also compact and relatively small for a wide angle lens. Focus ring and aperture ring are smooth and have a good feel to them. The aperture ring is detented at half f-stops from f2-f22. The lens feels solid and well constructed and is not weather resistant. The front is threaded for 67mm filters, which is nice.

I would recommend this lens, especially for the price point.  I would give the Fuji 14mm f2.8 lens the edge, it has the full autofocus, as well as manual focus and the ability to have auto aperture, but the Fuji is substantially more money. The Rokinon is a bargain and for me a nice lens to have in the bag and one that will get used, for nightscapes and landscapes. I will still keep my Fuji 14mm. The Fuji is a bit better corrected optically but the Rokinon does pretty well. The extra 2mm of the Rokinon does make a difference. I was also interested in the Rokinon 10mm but it is twice the weight of the 12mm and is not as appealing. The 12mm was designed for mirrorless cameras and therefore the size and weight are scaled accordingly, while the Rokinon 10mm appears to be a verison of their DSLR lens with a Fuji X-mount on the end, not as appealing. I am happy enough with this Rokinon that I do not feel the need to compare it to the Zeiss 12mm lens for Fuji.  For ultra wide I will stick with the Fuji 10-24mm f4.

Rokinon 12mm f2.0 for X-Mount – a first look

_MG_3048-web

Rokinon 12mm mounted on the X-T1

The Samyang/Rokinon 12mm f2.0 for x-mount was recently announced and has arrived in the stores. Samyang is the original manufacturer and the lens is also rebranded and sold under several names, including Rokinon.  I ordered one to take a look, nice and compact and it was certainly priced right. It is manual focus, manual aperture with no EXIF data being sent to to the camera, which is something that really irritates me, but oh well. At least Fuji anticipated that people might use other brands of lenses that might not provide that information so you can at least set the focal length using the camera menu. This allows you to identify the lens when you are using it in the field, but you do not get any aperture information.

I received my copy of the lens, packaged well for shipment in a plastic shell with a small manual and small cloth bag to hold the lens if needed in the camera bag. The lens shade is detachable and made from plastic. The locking mechanism  for the hood seems a bit weak and may wear after some on and off use, maybe not but I do not have a lot confidence in it. The aperture ring is smooth and has half stop detents from f2 to f22. The end of the lens barrel is threaded for 67mm filters. The focusing ring was smooth and gives a nice feel when focusing. The lens itself seems to be well built and rugged, it is not weather sealed. When inserted into the camera there is some play, it did not lock in place firmly.  I was able to twist and shift it a small amount between the stop in the lens mount, since there are no electrical contacts this should not really be a problem, although I wished it would lock in place better, this might be just manufacturing tolerances. The lens is light enough that it balances well with the camera.

Static testing

Distortion test

Distortion test

So off to shoot a few sample images. First off I wanted to see what kind of distortion I might get from a lens this wide. I figured there would be some distortion, it is hard to make a completely rectilinear lens and this was not an expensive lens by any means. The Samyang 14mm lens for dslrs had a really strong moustache type distortion which could be problematic.  So for my first target I set up a grid made from a filter from an air conditioner, it was   setup to be level and the camera was mounted on a tripod and square and level to the grid. As you can see from the image there is very little distortion. A small amount of barrel distortion that would be easily fixed in post processing, when and if you really needed to fix it, it most shots except for architecture you would probably not notice it.

One troubling thing, if you look on the image to the left is the yellowish color in the middle from the top to the bottom of the frame. This is not the color of the wall, and I did see this on the screen while taking the images, it is present in the images. The wall that this is on is a uniform blue color. It looks like it might be some issue with the coating or the type of coating with this lens, I don’t know if this is just my sample. So I brought out my other test chart. By the way these test charts are just something I threw together for me to see how lenses perform, other than careful alignment and doing the best I can to level and keep things straight, there is some room for some error. Not scientific at all so remember that.  Anyways, the next chart is made from some lens test charts by Norman Koren, downloaded and printed on white paper with my epson printer. They are mounted to a foam core board that is slightly yellowish and there are some spray glue remnants, remember this is not scientific, just my take on testing.

Up the chart went and everything was aligned. Test images were taken at all apertures. My purpose for this test was to see corner

Lens sharpness and vignette testing

Lens sharpness and vignette testing

sharpness and vignetting and overall lens sharpness. This image to the right was shot at f5.6 and also shows the same yellowish patches from the lens. Again this is disturbing. However, the lens is pretty sharp overall. Especially in the center, which is pretty typical of ultra wide angle lenses. At f2, which is wide open for this lens, it is somewhat soft, however the sharpness is acceptable at f2.8, both center and edge. The corners do not really get sharp until around f4 without sharpening applied and pretty good at f5.6. Below in the gallery are some corner crops from the upper left corner. Also there is pretty significant vignetting at f2 and gets reasonable at f4 and beyond. Click on the images to see larger versions and for the corner crops they are 100%.

Corner crop f2.0

Corner crop f2.0

Corner crop f4

Corner crop f4

Corner crop f5.6

Corner crop f5.6


Real world imaging

As I mentioned the color cast in the middle might not be noticeable in real world images. I did go out and shoot a few images in the real world.  These are shot at f11. The first was hand held and the second was on a tripod. Click on the images to see larger versions.

Cormorant statue at the park

Cormorant statue at the park

A view up the coast

A view up the coast

Here is a comparison shot with the Rokinon 12mm at f11 and the Fuji 10-24mm at 10mm and f11. The tripod was kept in the same location, just the lens was changed in between shots. You can see that an extra 2mm can make a difference in the field of view.

Fuji 10-24mm at 10mm and f11

Fuji 10-24mm at 10mm and f11

Rokinon 12mm at f11

Rokinon 12mm at f11

Conclusions

I was really hoping that this was going to be a great lens, the price was great, and Samyang has made some great lenses in the past. This lens is a little smaller than the Fuji 14mm f2.8 and has the same focal length as the Zeiss Touit 12mm f2.8 but at half the price. This price differential is what was really appealing for the Samyang/Rokinon lens. The build quality is there, the minimal distortion and the pretty good control of vignetting, and the corner sharpness even at wider apertures make this a really wonderful lens. The only thing that could be a problem is this discoloration I saw in my static testing. I am hoping this was just an aberration of my testing or my copy of the lens. I will give another lens a try and see if I can get a better copy, but before I send it back I will redo some of the testing on some different subject matter. The reality is that it is probably not noticeable, but I know some light colored building I will have to give it a try and see before I return it.

Is this a replacement for the Fuji lenses? No I don’t think so, it might be a nice addition or if you are on a budget it might be a good lens to get. It is really hard to beat the Fuji 14mm f2.8 or the Fuji 10-24mm f4, they are very high quality lenses.

Comparison of Rokinon 12mm f2.0, Fuji 14mm f2.8 and Fuji 10-24mm f4 lenses

Comparison of Rokinon 12mm f2.0, Fuji 14mm f2.8 and Fuji 10-24mm f4 lenses


Thanks for looking and I will update this when I have anything to update.


Y.A.R.R. Mateys!

Well to add to the confusion and general information here is Yet Another Rolling Review of the new Fujifilm X-T1 mirrorless interchangeable lens camera. I decided to write up a few of my initial observations and why I wanted to get this camera. I have been using the X-Pro 1 since shortly after it came out in 2012. A great small lightweight, easy to carry, all day type of camera. I got it to supplement my dslr. Something handy to carry, you know the camera you have with you is the one you are going to use most often. It was never a replacement for my dslr, but it is damn close.

The X-Pro1 has a great feel to it, I enjoyed the freedom from carrying a heavy camera. The Fuji lenses are some of the best around, the price reasonable. So what was not to like? Since it was a retro styled camera, it was truly retro, there was no ability to use an electronic release, something I often use in landscapes and long exposure photography, it had a threaded shutter button like my old film cameras. It used a mechanical release. While that would work, I like using a soft release so that meant unscrewing one and using the other and then possibly losing the soft release later.  Fuji later released the X-E1 and X-E2 cameras and they appealed to me but did not fit as well in my hand and they had my missing release capability. I was ready to pull the trigger on the new X-E2…… and then they announced the X-T1. Oh this was nirvana, true bliss and a bad case of G.A.S. developed. I wanted it. I read everything I could, followed the rumors and waited, not patiently, to pre-order. That day finally happened at the end of January of this year. About a month later the wait was over… it arrived!

Tulips at Descanso Gardens

Spring time tulips at Descanso Gardens, X-T1 and 55-200mm


So what was gained with this new addition.

1. The EVF, larger, better, faster and very usable. The X-Pro1 had the nice switchable hybrid viewfinder, I could switch from optical to electronic with the flip of a lever. I had pretty much used the optical initially but after time I wanted a better and more accurate framing in most circumstances, so I was mostly using the EVF on the X-Pro1. Also with longer focal length lenses the optical viewfinder just did not cut it. The X-T1 has a much better EVF. A very big difference.

2. Focusing, the X-T1 uses both phase detect and contrast detect methods. The X-Pro1 used only contrast as it lacked the phase detect pixels. This faster autofocus is nice in some circumstances but it was not a “have to have”. I think people on the forums rant and rave about autofocus speed way too much. People used fully manual focus lenses for a long time and were able to capture action, wildlife, you name it. I think this is more of an issue because of modern society puts more emphasis that everything needs to be “now”. Instant gratification, instant delivery. While nice, not critical for me. So just as accurate as before but faster.

3. Ability to use an electronic release, very nice for me. Intervalometer here I come… Also a really nice feature is that there is a built in native intervalometer in the camera! Bonus! Best of both worlds. Timelapse waiting to happen.

4. Faster recording of data to the card and faster frame rate for rapid exposures. Not a mandatory feature but a plus for those times it is needed. Also raw files are 14bit while with the X-Pro1 are 12 bit, that means there might be a difference at extremes for capturing more dynamic range. Might not see it in day to day use.

5. Ergonomics. This is more personal, but I like the layout of the buttons, much better for easy functionality. Dials that are easy to set and see. The grip is very nice and comfortable. I was worried that it would be too small as it is slightly smaller than the X-Pro1, nothing to worry about. I thought I would have to have the battery grip for it to be comfortable, but that is not the case at all. Having six function keys that are user configurable is wonderful. The screen tilts, this was not high on my list of features but it is useful. There has been some flak on the net about the directional buttons being too flush, yes they are different and quite flush. Yes they did feel odd at first, but after some use, it is easy to find them and the muscle memory is slowly adapting. So a definite plus in usability.

Korean Friendship Bell, X-T1 and Fuji 14mm

Korean Friendship Bell, X-T1 and Fuji 14mm

Like any product, it is not perfect. Nothing is, we just need to adapt, makes life interesting. None of these issues are deal breakers for me.

A. Exposure bracketing. This has been an issue since the X-pro1. The camera only allows +/- 1 EV automatic bracketing. This is just not enough, in my opinion. I would like to see a minimum of +/-2 stops but better yet would be +/- 3 stops or programmable range. And the ability to set the step size and the number of images per bracket.

B. I would like to see the histogram remain live and usable when the shutter is half pressed. Metering should not stop.

C. Tethering capability. I would love to see the ability to tether and have complete control over the camera from a computer. The wifi app for the X-T1 is very limited. Full tethering would be a great feature. It would also allow the user to control bracketing, exposure, and do bulb ramping etc.

I am sure there are other things that I will find over time, but then nothing is perfect. The camera is just a tool, and as a tool this is a very usable camera. Form, fit and function. Will it make me a better photographer? No, but any camera that is a pleasure to use will get used more often, and as we all know, practice makes perfect.

Chimps at the Los Angeles Zoo

Last month I headed out to the L.A. Zoo. I carried with me my trusty Fuji X-Pro1 and the two zooms, while at the Zoo I have the 55-200mm a good workout. I stopped and spent some time looking and watching the chimps.  They can produce some interesting expressions.  A lot like humans although I am not sure we can apply that many human thoughts to them, it would be interesting to know what they are thinking. This chimp always seems to have a somewhat sad expression. It may be the just the way his lips meet. (click on the image to see a larger version)

Waiting

Waiting

Here again is the same chimp although he has moved over to a small overhang. This looks to me like he has been given a “time-out” and told to sit and watch the others….


Time Out

Time Out

And here is a shot of the family group, all seeming bored and facing yet another day of the summer doldrums. I guess that is life at the Zoo.

Summer Doldrums

Summer Doldrums

Hope you enjoyed these images. Thanks for looking.


Sun Pillar

Well so far it has been a busy year and it only just started. I am taking a break from posting photos weekly and concentrating on doing some photo projects and experimenting. Here is a photo my wife Barbara took with her new Fuji X-E1. This sun pillar was pretty neat, she is still getting used the camera, but it is an improvement over her old G-10. Taken in Laguna Beach, using the 18-55mm zoom lens at 55mm. Enjoy.

Image of the week #52

The final image for this year… been a long road but a fun one. I sure hope that this coming year is better for me and for everyone else as well. This sunset was taken from Laguna Beach after a brief but intense rain storm. It was just starting to clear a little locally but then sun peaked out right as it got close to the horizon. You can see Catalina Island off in the distance. Taken with the Fuji X-Pro 1 and a Samyang 14mm lens. Enjoy and thanks for looking this year at my images, many more to come in the following year. Happy New Year everyone!


Image of the week #51

Well the end of the year is near and the world did not end on the 21st! So we are in the final stretch and it will be nice to start a new year. We are having some on and off light rain which we sure could use. This was taken in a local park. I ended up crawling around on my hands and knees to get this shot. The wet made things a bit chilly but once I got back in the car the heater took over and soon I was warm. Taken with the X-Pro 1 and the 60mm macro lens.